In today’s digital landscape, taking web page screenshots is a vital task for numerous applications, including report generation and website monitoring. This post will walk you through the process of capturing HTML screenshots and uploading them to Amazon S3 using AWS Lambda, a serverless computing service that executes code in response to events.
Step 1: Setting Up Your AWS Environment
- Create an S3 Bucket
- Log into your AWS Management Console.
- Navigate to S3 and click on “Create bucket.”
- Choose a unique name for your bucket and select a region.
- Adjust other settings according to your needs and click “Create bucket” at the end.
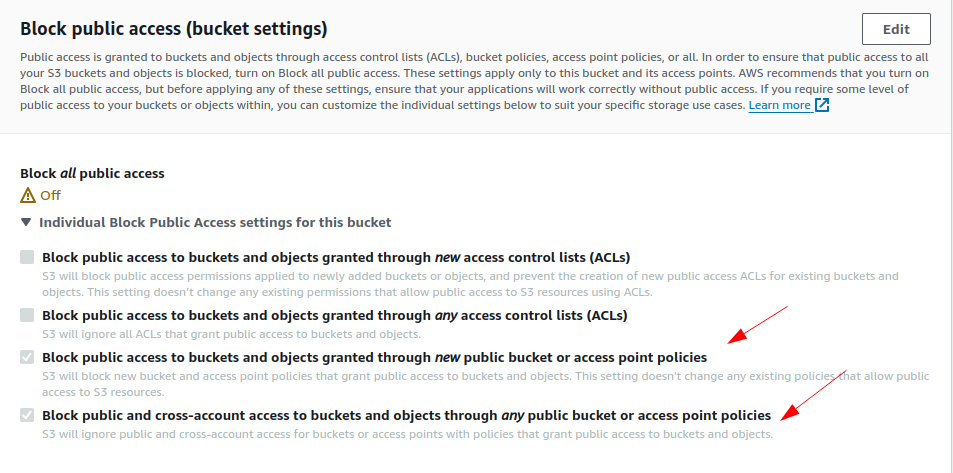
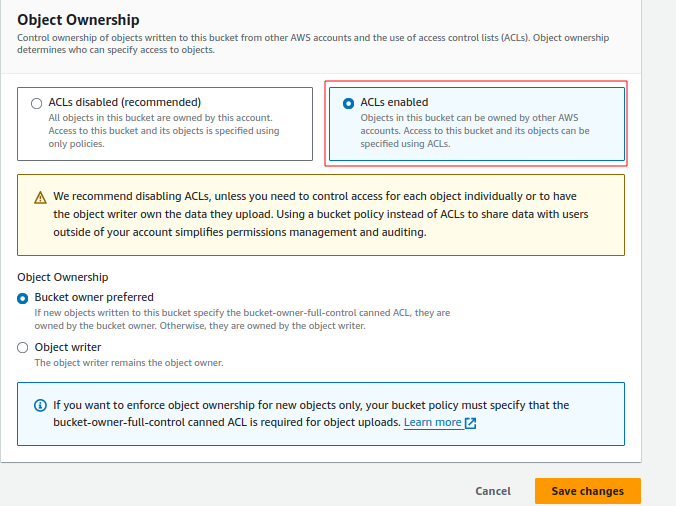
- Go to the permissions tab and modify the permissions as shown in the provided images.


- Create an IAM Role for Lambda
- Access the IAM (Identity and Access Management) console.
- Click on “Roles” and then “Create role.”
- Select “Lambda” as the intended service for this role.
- Create a custom inline policy and input the following JSON code:
{ "Version": "2012-10-17", "Statement": [ { "Effect": "Allow", "Action": [ "s3:PutObject", "s3:GetObject", "s3:DeleteObject" ], "Resource": "arn:aws:s3:::your-bucket-name/*" }, { "Effect": "Allow", "Action": [ "s3:ListBucketMultipartUploads", "s3:AbortMultipartUpload", "s3:ListMultipartUploadParts" ], "Resource": [ "arn:aws:s3:::your-bucket-name", "arn:aws:s3:::your-bucket-name/*" ] }, { "Effect": "Allow", "Action": "s3:ListBucket", "Resource": "*" } ] }- Attach the AWSLambdaBasicExecutionRole to this role.
- Provide a name for the role and click “Create role.”
Step 2: Create the Lambda Function layer
Lambda Layers is a convenient way to manage common dependencies between different Lambda Functions.
The following set of (Linux) commands will create a layer of this package:
git clone –depth=1 https://github.com/sparticuz/chromium.git && \ cd chromium && \ make chromium.zip
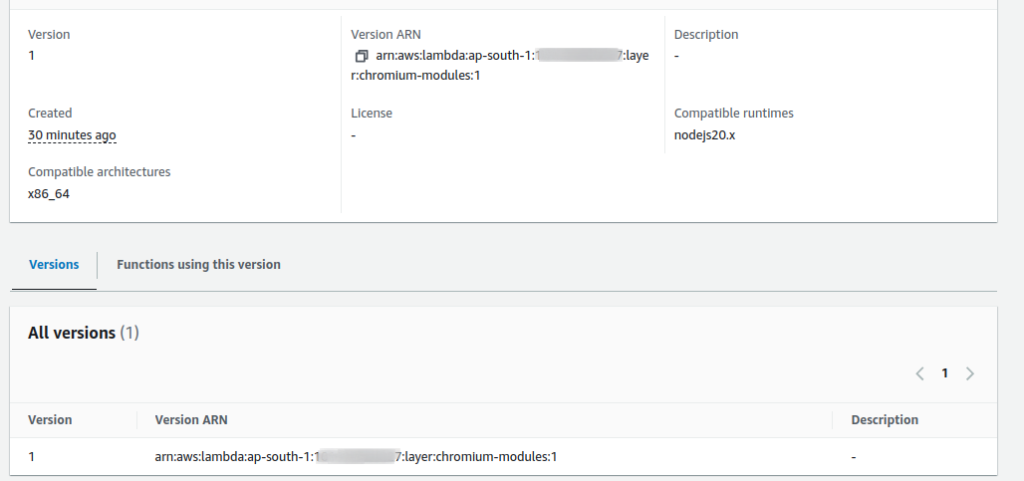
The above will create a chromium.zip file, which can be uploaded to your Layers console.

Step 3: Create the Lambda Function
Next, we will set up the Lambda function to capture screenshots and upload them to S3.
- Set Up Your Lambda Function
- Navigate to the Lambda console and click “Create function.”
- Choose “Author from scratch.”
- Enter a name for your function and select Node.js as the runtime.

- Under “Permissions,” select the IAM role you created earlier.
- Click “Create function.”
- Once the lambda function is created we’ve attached layers into the function. Please refer below


Once a layer is attached into a lambda function. We should change minor configuration on Memory and Timeout.
Memory: 1024 MB
Timeout: 3 mins 0 sec

- Add Dependencies
- To take screenshots, we’ll use the Puppeteer library. Since Puppeteer has additional dependencies, it’s essential to package it with your Lambda function.
- Create a new directory for your Lambda function and navigate to it:
mkdir html-screenshot-lambda cd html-screenshot-lambda - Initialize a new Node.js project:
npm init -y - Install Puppeteer and AWS SDK:
npm install puppeteer-core aws-sdk
- Write Your Lambda Function
- In your project folder, create a file named
index.jsand add the following code:
const AWS = require('aws-sdk'); const chromium = require("@sparticuz/chromium"); const puppeteer = require("puppeteer-core"); const s3 = new AWS.S3(); const BUCKET_NAME = 'html-to-image-testing'; // Replace with your S3 bucket name exports.handler = async (event, context, callback) => { let result = null; let browser = null; try { browser = await puppeteer.launch({ args: chromium.args, defaultViewport: chromium.defaultViewport, executablePath: await chromium.executablePath(), headless: chromium.headless, ignoreHTTPSErrors: true, }); let page = await browser.newPage(); await page.goto(event.url || 'https://google.com', { waitUntil: 'networkidle2' }); // Take a screenshot const screenshot = await page.screenshot(); // Upload the screenshot to S3 const s3Params = { Bucket: BUCKET_NAME, Key: `screenshots/${Date.now()}.png`, // Unique key for the screenshot Body: screenshot, ContentType: 'image/png', }; await s3.putObject(s3Params).promise(); // Get the page title result = await page.title(); } catch (error) { return callback(error); } finally { if (browser !== null) { await browser.close(); } } return callback(null, { title: result, message: 'Screenshot taken and uploaded!' }); };- Remember to replace
YOUR_S3_BUCKET_NAMEwith the name of the S3 bucket you created earlier.
- In your project folder, create a file named
- Package Your Lambda Function
- Create a zip file that includes the code and the
node_modulesdirectory:zip -r function.zip index.js node_modules - Return to the Lambda console and upload this zip file in the function code section.
- Create a zip file that includes the code and the
- Set Up a Test Event
- To test your function:
- In the Lambda console, click on “Test” and create a new test event.
- Use the following JSON structure:
{ "url": "https://example.com" } - Replace
https://example.comwith the URL you wish to capture.
- To test your function:
- Run Your Test
- Execute your test, and the function will capture the HTML screenshot and upload it to your designated S3 bucket.
Conclusion
You have now successfully set up an AWS Lambda function that takes HTML screenshots and uploads them to Amazon S3. This setup is versatile and can be used for various purposes, including website monitoring and report generation.
Feel free to enhance this functionality further by incorporating error handling, scheduling the execution through CloudWatch, or triggering the function via API Gateway for on-demand screenshots.
Happy coding!
Troubleshooting
Please refer the below link for if you facing Error: Failed to launch the browser process!

